
The city of lost knowledge.
Tetyth is the fourth stage in Riviera: The Promised Land, and is the midmost stage of the game. This stage begins in Chapter 4 - Sunken Wisdom. After sealing away Lindwurm at the apex of Nelde Ruins, the heroes catch wind of an uprising of demons occurring within Tetyth, a city that was sunken in ancient times supposedly because its citizens angered the gods. Ein and his party soon after set their sights on Tetyth to root out the scourge of demons.
Lake Cavern[]
"The cavern found beneath Tetyth's lake. Lake water drips from above occasionally."

As soon as the stage begins, the characters will talk about Tetyth briefly. Do not waste a Trigger Point (TP) here; instead, use this spot to catch up on some Practice if needed. As soon as they enter the next room, they'll encounter a couple of Mercury Ooze; they shouldn't be too much of a problem, but watch your items. After they've been dealt with, inspect the Ground to discover a Grasshopper; it is needed as fishing bait for later.
Moving on to the third and last room of this area, nothing happens until the player switches to Look Mode LM. The actual TP event here does nothing of interest though, and should not be bothered with. Proceed to the next area.
Sinking Island[]
"The island in the middle of Lake Tetyth. It has been sinking since ancient times..."
Upon entry, you will be introduced to the twins: Red Sage and Blue Fool who plan to drown the party by drastically increasing the water level. This, however, doesn't become something to worry about until you reach the Carne District. There is an event here, however it's better to just avoid it because it will wet up your inventory, which may cost you some items you may not want to waste.

In the next room, another demon encounter awaits; they shouldn't pose much of a challenge. After defeating them, Look Mode presents an opportunity to make use of the Fishing Rod, Grasshopper, and Pouch if you have obtained them; examine the water and best of luck. If not, it can't hurt to pick up rock lying around.
The third and last room takes you to the entrance of Tetyth itself, with little more than a chest; upon further inspection, the ladies will freak out over a snake that was near it. Failing the minigame event will displease them all, but success has the opposite effect. The chest itself contains a Tarot x5.
Carnea District[]
"In the city said to be built by an angel, Carnea is a low-ground residential district."
This area is special in that it allows for only 50 turns to advance to the next; this area is largest seen thus far and if the player fails to leave in time, they are treated to a Game Over. It's best to keep in mind that every action (moving and interacting with events) uses up one turn; Rose does you the courtesy of reminding you to hurry up, so there's no need to keep count. Follow this guide closely and careful; there is a wyrm at the end of the area who was placed there solely to screw over the player.


First, pick up the Lala Sutra if desired, then head onward. It's advised to avoid chests that are not necessary to advance. In the second room, there will be two options: Climb Roof, or Go >>; Climbing upward is the way to progress, but the item needed to get past a door is on the alternate path. For now, head right and suddenly demons (HINT: now is not the time to be a coward)! Select Serene to stand on the switch; you will get an item out of it later, but it will upset her. Go on ahead into the fourth room and there will be three chests; only the green one is important, so ignore the others. You'll now be able to clear the area. The 5th room beyond here is completely optional, but recommended for a good item that can be had later on.
X = Your current location if following properly.
                       [ 9 ] - [ 10 ] >

                          |

                [ 6 ] - [ 7 ] - [ 8 ]

                  |

        [ 1 ] - [ 2 ] - [ 3 ] - [ X ] - [ 5 ]


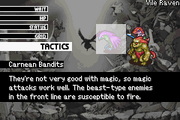
Skip to the next paragraph if you do not want to do this sidequest. In the 5th room, you'll encounter a trio of Bat demons harassing an Undine; choose to save her, and she will get away, angering them into attacking you. As seen in the thumbnail, the Devil Imp is the one that will hurt the most, so be sure to bring in Lina and Fia to boost your resistance to LIT. There's nothing else here, so head on back to Serene.
Once you'd gone back to Serene, she should have a Black Scythe x10 waiting for you. Backtrack to Room 2 and now climb upward to room 6.
                       [ 9 ] - [ 10 ] >

                          |

                [ X ] - [ 7 ] - [ 8 ]

                  |

        [ 1 ] - [ 2 ] - [ 3 ] - [ 4 ] - [ 5 ]


A few demons are in the way, so let's do something about it. Inspect the door and the Rusty Key will do its thing, allowing for further advancement. Now that you're in the 7th room, first check the glimmering object in LM and agree to send Rose after it; you will be rewarded with a Mana Wisp. Next, head right (Go >>) to Room 8, but Ein will be shot at; dodge successfully to avoid HP damage. In Room 8, you will find the culprits.


After defeating them, a chest will appear, which will yield an Elfin Bow x40. In order to progress, you'll need another key, which is found in the Darkness in LM. Waste no time and head back to Room 7, then head upstairs to Room 9. The Crystal Key you found back in Room 8 will open the door so that you can head to the last room. Go on through and there will be a scene involving the twins. More importantly, you will encounter the Elder Wyrm here.
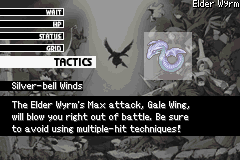

This guy will put you in hot water if you let his Rage Meter hit max, as he will blow your party all the way back to Room 8, forcing you to use up turns to get back to him so you can hopefully kill him without a repeat. Exercise caution, pay close attention to his WT, and avoid multi-hitters; don't worry too much about S Ranking, just concentrate on not getting blown away even a single time. He can take a lot of hits, so this may take a while without the best items to deal with him. Just when you thought we were done, the game will throw one last event your way: a minigame where you have to catch the manual Fool dropped. You don't want to miss this, so do your best. After this, you can proceed to the next area.
Colosseo[]
"A battle colosseum outside of Carnea. It was filled with battles between warriors and beasts."
You are now at the entrance of the Colosseum, where there is a chest and little else. Go on inside and you'll run into some ropes.
- Right - Yields a Banango x5.
- Middle - Drops a barrel and subtracts 5% HP from Ein. (Best to avoid this)
- Left - Drops a Killer Beehive, from which the player must run via a minigame.
- None - Ignores the ropes, triggering nothing.
The Trap Memo 1 that can be picked up after choosing a rope changes depending on which one was picked. Just so that we don't waste any turns, let's go with the Right one (Banango); still, it's ultimately up to you. The rope leftover can be picked up for free, which will have its use in the next stage.
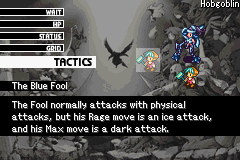

Progress to the next room, and prepare for a fairly harsh boss battle against the Blue Fool. Voltage Raid is one of the best options that the player may have access to by now. After defeating Fool, move on to the next room in which the path forks yet again. There is also a barrel here with Banango inside, but it requires the Hammer acquired in Nelde to break. Upward is the way out, but there is a very powerful item in the 5th room to the right which may be necessary to defeat the stage boss without retrying. If the item is desired, now is the time to get it.
                                      [ 8 ] >

                                         |

                               [ 6 ] - [ 7 ]

                                 |

       [ 1 ] - [ 2 ] - [ 3 ] - [ 4 ] - [ X ]
Inspect the Chained Sword and this will begin the event to unbind it. If you choose to...
- Take It - Fia will be displeased; a button-masher game ensues. Ein will lose 15% of his health. Zantetsu x5 acquired.
- Ask Fia - Fia will be pleased; a list minigame will begin. Zantetsu x10 acquired. (Best option)
- Leave It - Does nothing. (Why waste turns on this then?)


Colossal Warriors
It's a dead end, so head back and move up to the 6th room. A demon encounter with Colossal Warriors will begin in here, so be ready. For S-Ranking this battle, you can get Mithril Sword if you finish the Strong Guard last. After the battle, the water level will have increased, preventing the group from traveling back to the previous rooms. Before traveling to Room 7, there is an event here in LM involving the lion head statue.
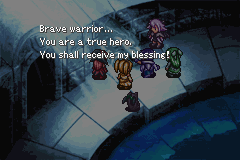
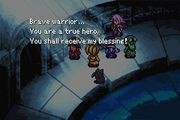
How exactly the game calculates whether or not Ein is worthy has yet to be determined. Some believe it depends on how often did you run from previous battles.
- Put Hand In - Ein is blessed with a permanent boost of +3 to STR, MGC, AGL, and VIT. 15,000 pts awarded; increases the mood of all four heroines.
- Put Rose In - Amusing, but penalizes the player by costing Ein 5% HP and Cierra's trust.
- Ignore - Does nothing.
Room 7 contains another barrel which will yield a Blood Fang x50. Head outside to Room 8 and you'll be treated to another fight. There is nothing of interest here, so just advance to the Aura Plateaus.

Aura Plateaus[]
"Located in the middle of Tetyth, it is often called the White Plateaus due of the white limestone."
This area is a quick and straightforward one. There is nothing in the immediate area, but attempting to move forward will trigger a "trap" quiz set up by the twins. The answers should be obvious, and the player can skip it altogether if they want.
- O - get Banango x05
- X - get struck by a thunder -10%HP to Ein
Answering the question will allow an opportunity to collect the Trap Memo 2.


In the next room, you guessed it: demons. There are two events in here that you may not want to miss: first, the Mint, which will open a window of opportunity for the second bathing scene. The other is to check the ground, which will reward you with Mithril. In the third and last room, going into LM will trigger an event in which the party will hear a sound nearby. It's then that the player can choose to either investigate or move on. Next, you may:


Serene checking the sound coming from the window
- Ask Serene - in PSP version, you'll be rewarded with a CGI.
- Throw a Rock - Starts a quick time minigame. Success will result in a bat flying out of the window. If you mess up, Rose will gladly remind you how much you fail.
- Ignore - Same as the first option.
The Bat[]


Once the bat has been revealed, the play may then choose to:
- Catch - Catching it successfully will add Mr. Bat III to your inventory and earn you some more 3000 pts. A miss will trigger a battle with a Devil Imp. After winning the battle, you'll be able to collect Fang Bat Wing from the ground.
- Slash - Killing it successfully will earn the player Fang Bat Wing. A miss is just embarrassing; either way, Lina will not be happy about it.
- Ignore
By now, assuming the player has been following the guide closely and was not set back by the Elder Wyrm or other distractions, the turn count should be 60 maximum. The Cathedral Library requires that the player is below 120 turns to access.
St. Claremonts[]
"The high ground is filled with religious buildings like churches and sanctuaries."


Undines of Tetyth
Immediately upon entering, the group will remind us that the water is still on our tails, but there's nothing in this first room beyond a regular chest so just move on into the next one. In the second room, you have access to four directions; if you rescued the Undine back in the Carnea District, then head down first as it will allow for you to obtain Iria's Bow. You will need to come back later; if you have not done the Undine rescue sidequest, heading down this path serves no purpose. Anyway, head on back to the center room and this time head to the high ground.
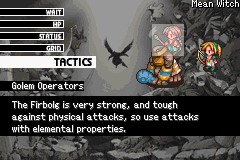
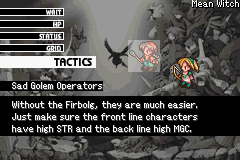
Here, you'll be attacked by a couple of female demons and their golem. If you have the Golem Manual key item, you can input the code: "^ v ^ > (Up, Down, Up, Right)", which will remove the Firbolg from the battle. The battle is a lot tougher if you do not put in the code; if you do put the correct code in, then they will begin at Max Rage.


Regardless, once you're done with them, head on back to the lowgrounds where you met the Undine earlier and she'll actually give you the Iria's Bow this time. Remember that if you take too long to return, the water will reach that area and make the item impossible to acquire. Now, backtrack to the center room again and this time head forward and be ready for a demon battle. After the battle, you'll be able to move on ahead or climb upward; doing the former is a waste of time because the chest in the next room is blocked off by an invisible barrier. Climb the buildings.


              [ 8 ]   [ X ] - [ 6 ] - [ 9 ] >

                 |       |       |

       [ 1 ] - [ 2 ] - [ 4 ] - [ 7 ]

                 |

               [ 3 ]


You are now in the room marked with "X" above. The chest is blocked off by an invisible barrier, but we'll return for it later. For now, just head on to Room 6 and you'll run into yet another patch of demons. After they are beaten, Hop the Roofs and you'll now be in Rm 7, and you'll be able to open the green chest here; the Golden Key inside is needed to open the door back in Rm 8, where the Golem Operators were. You can completely ignore this diversion if you wish, as nothing you get from this is required to progress. Otherwise, if you're willing to backtrack, the Golden Door leads back into Rm 5 but now the chest can be opened. Your grand reward: Holy Grail + 3000 pts. If you spend at least 15 turns in St. Claremonts area Rm 2 will be partially flooded and a bottle will appear. If you have one spare TP, you can:
- Open it - Fia will be displeased, but you will gain Bottle and Music Sheet event items.
- Throw it - no effect.
- Ignore it.


From Rm 6, head forward into the last Room (9) and you'll encounter The Sage's Golem. The Golem Manual's code "^ v ^ >" will work for this one too, otherwise you will have to battle it to move on. Regardless of whether it is battled, collect the Paper (TP required) to acquire the Trap Memo 3. This is the end of St. Claremonts.
Mizel Bridge[]


"This holy bridge is where an angel once descended. It leads to the Flaybell Cathedral."


The CG you get for sparing the twins' lives
Mizel Bridge is a quick and easy one. By now your turn count should be somewhere in the 80-90 range. There's a chest in the immediate area (with Elfin Bow, Estoc or Flame Whip inside). But if you're concerned about your turn count, ignore it and move on. In the 2nd room you'll face the Red Sage; the battle provides a decent challenge so be prepared. After the battle you get to make a life or death decision as to whether or not the twins can live. Letting them go is the best option, as it makes everyone happy. Proceed to the Flaybell Cathedral.
Flaybell Cathedral[]
"The spot where the fallen angel has resided. Inside, a giant goddess statue stands."


It's been a hectic journey, but the stage is finally wrapping up. Normally, this is the last area, but if you've gotten to the Flaybell Cathedral within 120 turns, then you can access a secret area. First, head forward into the next room and get ready for a battle against a trio of Wisps and a Mean Witch. After the fight, head into the third room and examine the statues twice; the first inspection will give an exposition on their history, and Ein will note that the forehead is shining on the second one. Checking it in the third room is a must if you want the Angel Gem, but you'll need to backtrack to Rm 2 in order to make the jump; if the player does not care about the Angel Gem, time can be saved by simply examining the statues in the second room instead. The fourth room is where you'll face off against the boss: Archangel. Tip: Don't use Serene.

Cathedral Library[]
"The library inside the cathedral. It has many books on the dawn of Riviera and the gods."
Once you've entered the Cathedral Library given all criteria are met, you'll begin by climbing upward on the giant statue. Triggering the events in these rooms while on the statue will reward the player with some pretty funny scenes, but keep in mind that each event will lower the mood of all the girls. If Ein noticed the gleam on the statue before even making the jump, the Angel Gem is at the top of the statue and the player can choose to give it to the heroine they like.
After jumping, you'll be in the actual library. The Giant Book will present you with the option to take any of the characters' preferred page. You can only pick one; the page you pick will determine what Battle Item you'll get later when you speak to Claude after the stage is over. Ein's will yield Clene Met, Cierra's will reward you with Nost Lenne, and Fia's is Ceneca Qui; Serene and Lina's do nothing, so they're not recommended.


Progress to the fifth room and you'll encounter the final pack of demons. You must jump in order to progress; if you fail, the party will fall into an otherwise inaccessible area back in Flaybell and all but Serene will lose 5% of their HP. To add insult to injury, the chest here is empty. However, if you make the jump, you'll be in the 6th and last room of the Library. There is one more event here that will yield the Valdes Scripture. After acquiring it, Exit the library and you'll be returned to first room of Flaybell.
Music[]
The theme of Tetyth is "Tetyth, the Underwater City", also known as "Tetis, the Underwater City"
Trivia[]
- Cierra says that according to the legend, Tetyth was a holy city built by 12 beautiful fallen angels. The angels were wingless, because they were exiled from Asgard. The statues in the Flaybell Cathedral represent them.
- The huge books in the Cathedral Library might suggest that the ancient Tetythians were giants.

| Riviera - The Promised Land | |
|---|---|
| Content | Artwork - Translations - Audio drama |
| Main characters | |
| Important characters | |
| Locations | Heaven's Gate - Elendia - Lacrima Castle - Nelde Ruins - Tetyth - Mireno Cemetery - Yggdrasil - Maze of Shadows - Parveeju |
| Mechanics | |
| Lore | |